Wednesday, April 30, 2008

Girls Day Out

Mary Ashley and I enjoyed a special girls day out today, and it was packed with memorable outings. It is such a treat to spend one-on-one time with one of the children, so we enjoyed our time to the fullest. First we attended Mary Ashley's preschool field trip to the Montgomery Museum of Fine Art. We had a lovely time exploring the grounds of the Alabama Shakespeare Festival. After feeding the ducks and attending a puppet show at the museum, Mary Ashley and I visited some favorite spots in Montgomery. We had some time for treasure hunting at one of my favorite shops before we joined friends for tea. Then we picked up fresh flowers from a local market and browsed a favorite fabric store before picking up the boys from school and reuniting with the rest of the family at home. Along with a sweet little girl, I brought home pretty pink tulips, vivid green plates and a delicate white teapot. We concluded our perfect day by going out to dinner with the family before heading to church together. What a lovely, happy day!


Ready for some girl time.


These two became fast friends at the beginning of the school year. Raney's family heard a lot about "Mish-Ashey," and we have heard a lot about Raney too.


Girls just want to have fun!


Mary Ashley's P3 class.


Time 4 Tea

The highlight of our girls day out was having afternoon tea with the Burches. I'm so sad that this sweet family will be relocating to Huntsville soon. Shannon has been such a sweet friend. Her daughter Lilli and Mary Ashley are in the same Bible class, and already they have developed such a sweet friendship. Even at 4, you can tell that they are planting seeds of friendship that could blossom for a lifetime. We enjoyed spending a lovely afternoon with Shannon, Lilli and Mrs. Bonnie Burch.


On the lookout for Lilli. "Here she comes, Mommy!"


The girls drew smiles from surrounding tables as they giggled with delight during our afternoon tea. They decorated a princess sticker book together, tried on hats, sipped strawberry tea and nibbled teapot-shaped sandwiches. What more could a girl wish for?


Posted by Picasa

Friends 4 Life


Lilli's mom gave the girls pennies to throw into the fountain. Shannon said Lilli wished that she could be a princess when she grows up. Mary Ashley wished that she could be a princess starting now.


Posted by Picasa

Tuesday, April 29, 2008

Basket Cake

I made this basket cake to say welcome to visitors at our congregation's Friends Day this past Sunday. Several people asked me about it, so I'm sharing directions here. I hope this easy design will inspire you to celebrate the loveliness of spring.

To make a basket cake, bake a cake in two round baking pans. Allow the cakes to cool completely. Carefully remove the first layer, and position it on your serving platter. Frost the first layer with a crumb coat, and refrigerate until the icing has set. Frost it again to get a clean covering of icing. A good tip is to keep a cup of hot water nearby when icing a cake. Dip your icing spatula or knife into the water as needed, and the heat from the water will help your utensil glide smoothly across the cake.

Remove the second cake layer, and cut it in half. Place it on top of the cake to make the body of the basket. Cut a small half-circle from the remaining half-layer, and reserve for another use. The remaining arc of cake will serve as the handle. Position the handle on the top of the cake, and secure it to the basket with a little icing if needed. Frost the top and sides of the cake and inside of the handle and basket. Use a large star-shaped decorating tip to decorate the handle. Begin by piping icing onto the inside of the handle and basket. Start at the bottom, and pipe icing up and down as you work around the inside area of the cake. Next, pipe icing in similar fashion around the outside of the cake to cover the handle. Then pipe icing onto the top of the handle, careful to cover any open spots from inside or outside the handle.

The basket weave design is a lovely way to cover a cake, and the technique is easy to master. Use decorating tip 47, ridged side up, and work from left to right across the cake. Start with the top of the basket. Pipe a straight line from the brim of the basket to the bottom of the basket. Next, pipe short, evenly spaced perpendicular lines over this first line. Then pipe the next line from brim to edge, overlapping the ends of the short perpendicular lines. Now pipe short perpendicular lines between the last ones, beginning at your first parallel line and crossing over the second. Continue this process across the top of the basket, then around the side of the basket. Use the star tip to outline the edges of the basket with shell borders.

To complete the cake, fill the basket. You can pipe icing flowers onto the cake, or use real or silk flowers. If you use real flowers, choose an organically-grown, edible variety or simply gather blooms from your garden. Just cover the stems with plastic wrap before inserting them into the cake. Add a bow to complete the look. You could fill this versatile basket cake with other things as well. A chocolate cake filled with chocolate-dipped strawberries would be delicious for adults, and a holiday cake filled with seasonal candies would delight children. Think patriotic star cookies to light the Fourth, colorful silk leaves for Thanksgiving, candy canes and greenery for Christmas, and marshmallow peeps for Easter. However you fill the basket, what a great way to celebrate the bounty of blessings that fill our lives!


Monday, April 28, 2008

Make a May Basket

Some of you may remember the arrangements that dangled from my dining room chandelier for Mary Ashley's fourth birthday party. Lovely and pink, those posies have added a touch of spring to a neglected light fixture. I'm sharing directions for this easy craft here, hoping you'll consider making one to use as a May basket to celebrate the beauty of spring. Wouldn't these arrangements add a sweet touch hanging from branches at a garden party or outdoor wedding?


To get started, you will need a plastic foam cone, fabric, scissors, straight pins, rick rack, fabric glue, silk flowers, wire cutters, wire-edged ribbon and a floral pick. First choose fabric for your pretty posy. For Mary Ashley's party decorations, I used polka dotted fabrics, ribbon and rick rack in shades of pale pink, dark pink and lime green.

Press the fabric first, then place the cone on a straight edge of the fabric. Align this straight edge with the seam that runs lengthwise down the cone, and secure the fabric along this seam with straight pins. Then roll the cone to wrap the fabric around the cone, and overlap the pinned edge of fabric. Cut the excess fabric away, leaving enough to turn under the loose fabric edge to make a seam along the length of the cone. Before securing this seam with straight pins, trim excess length from the bottom of the cone. Leave only about an inch of fabric dangling, then fold this up and pin it to the side of the cone. Now wrap the fabric taut around the cone. Fold the rough edge under and pin it to the cone, careful to keep this line straight. Trim fabric from the top of the cone, leaving about an inch extending over the cone's edge. Pin this fabric to the top of the cone.

Next, cut two pieces of rick rack a little more than twice the length of the cone. Fold the first piece in half, and pin the center point to the bottom of the cone. Pull the rick rack to the top of each side of the cone, and secure with straight pins. Repeat with the other piece of rick rack, making sure you cover the cone's fabric seam with one of the pieces. Secure the rick rack to the fabric with a couple of dots of fabric glue to keep it in place.


Next, use wire cutters to cut silk floral stems, leaving enough length to insert the flowers into the foam. You might want to tentatively arrange your bouquet before poking stems into the foam. Generally, it is easiest to plan your arrangement working from largest to smallest flowers. And an odd number of flowers is usually most pleasing to the eye. Insert the flowers into the foam, then fill in with greenery as needed. When you are satisfied with the arrangement, finish it off with a ribbon bow attached to a floral pick and inserted into the foam. Pin a length of ribbon to the sides of the cone, and you are ready to greet spring with a little loveliness all your own!


A petite posy welcomes little ones who visit our playhouse this spring.

Playhouse photo by Nathan Prichard

Sunday, April 27, 2008

Potty Talk

When I voted on my friend Allison's recent blog poll that I don't enjoy bathroom humor, I didn't think about my little princess on the throne. Two-year-old Emma was in and out of the bath last night trying to go potty for the first time. She is so close! I got this clip of her looking at books, excited to realize that princesses go potty too. So, Allison, I guess I would have to admit that I do, in fact, enjoy a little potty talk after all.

Thursday, April 24, 2008

Time to Pray


God's Day
by Melissa Lester
All night long I watched you sleep, snuggled in your bed.
I whispered softly my love for you and stroked your weary head.
I cradled you till the sun came up and you rose to meet the day.
I was eager to hear your waking thoughts, but you didn't take time to pray.
I knew what the day would hold for you -- a new struggle in every task.
I knew that you would need my strength, but you didn't take time to ask.
With arms outstretched I walked with you as you faced a trying day.
I was ready and willing to carry your burdens, but you never glanced my way.
I showered you with blessings, and you accepted them all with glee.
I waited patiently for your thanks, but you had not a word for Me.
The day is coming to a close; the end is drawing near.
I walked beside you all the way, but you forgot that I was here.
You faced your troubles on your own, and now worry fills your head.
How different your day could have been if you had leaned on Me instead.
Tomorrow is a new day, and I will walk with you again.
I hope that you will turn to me -- your Savior, Father, Friend.

Wednesday, April 23, 2008

Mary Ashley's Preschool Program

Mary Ashley poses outside the church building, a P3 graduate.

Sunday afternoon we attended Mary Ashley's end-of-the-year preschool program. It was such a joy to watch all the P2 and P3 classes standing on the stage, so big and confident after a year of school. The children recited memory verses and sang songs for the adoring crowd. Mary Ashley had a speaking part, and my heart was in my throat as she took her spot on the risers for the "Humpty-Dumpty" song. Only in recent weeks has she overcome her shyness to recite a memory verse in Bible class, so I wondered how she would react to a packed crowd of parents and grandparents. In rehearsal, teachers said she gripped the microphone so tightly that her fingers started to change color, so they took the microphone into the classroom and let her practice saying her line in that more intimate setting.

When she stepped into place Sunday, I could feel my heart beating as the song began. Please, Lord, give her the confidence to say her line, I prayed. The children began singing, "Humpty-Dumpty sat on a wall./ Humpty-Dumpty had a great fall./ All the king's horses and all the king's men/ Couldn't put Humpty together again ... ." I held my breath as the song played on, every note bringing us closer to her speaking part. Finally, the first soloist took the microphone. "Listen up!" he called. "Up! Up! Up!" His exuberance drew laughter and cheers. As the second soloist took the microphone, I could see Mary Ashley looking wide-eyed into the crowd. "They tried to push him up," the pretty little girl sang out. More cheers, and now the microphone passed to Mary Ashley. Would she do it? Would she say it? She bowed her head, paused-- you can do it, Sweet Girl -- then sang, "Patch him up. Ch-ch-ch-ch-ch." She said her line, complete with the sound effects and hand motions! Then she raised her head, clasped her hands and flashed a bashful smile to the cheering crowd before jumping back into the song.

And in that moment, my sweet little girl grew just a little bit taller right before my eyes.

Hearing the children sing "I'm a Little Teapot" was just my cup of tea!


Mary Ashley singing her heart out.


Crossing the stage to hug her teacher and accept her certificate for completing Preschool 3.


Posted by Picasa

Monday, April 21, 2008

The Girls, Grandparents and Good Times

My parents kept the girls overnight this past weekend so I could do the ladies day in Cedartown, Ga. I knew Mary Ashley would be excited to have some uninterrupted time with Meme and D-Dad, but I was a little worried that Emma might have some separation anxiety when I left for Georgia. Especially since Joe's recent hospital stay, Emma has been worried to let me out of her sight. She wanted to be held a lot Friday, so I was a little worried as the time of my departure neared. But when Mary Ashley mentioned that she was hungry, my mom put out snacks for the girls. Emma lit up when she saw food, toddled into the kitchen and sang out, "Bye-bye, Mommy!" Who knew all it took to replace me was a handful of Goldfish?

I don't think either of the girls slowed down long enough over the weekend to realize I was gone. Mary Ashley and Emma had a wonderful time playing outside at Meme and D-Dad's house Friday, eating pizza and watching a movie. And Saturday was packed with fun. After meeting a celebrity at a local store, the girls were treated to lunch out and afternoon play at Oxford Lake. The girls made lots of special memories during their visit and can't wait to spend time with Meme and D-Dad again soon. I am so thankful for the special relationships our children enjoy with their grandparents -- and also for the beautiful images my dad captured of their time together!

Mary Ashley loved picking flowers for Mother and me at Oxford Lake. She was adept at handling all the playground equipment with a bouquet in hand. She caught the eye of a little boy a couple of years older than her, and he followed her around the park picking flowers for her and trying to make her laugh with silly tricks.


Enjoying the view from the top.


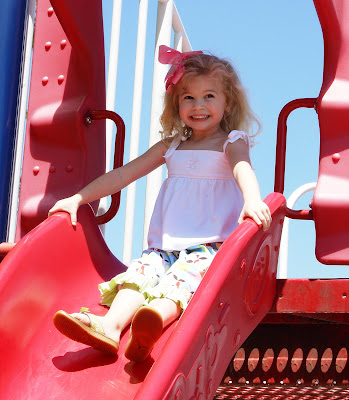
Ready to go down the big slide!


My parents took the girls to meet Dora at a local store Saturday, and Mary Ashley was eager to sit with her. Christian was a little jealous when he saw this photo on our computer Saturday night. "Hey!" he said. "Did Mary Ashley go to Disney World yesterday?" I assured him that no, she did not go to Disney World, just to Meme and D-Dad's. In his mind, though, I think this was worse because the children love to spend time with their grandparents!

Photos by Bob Prichard


Posted by Picasa

Emma at Play

Wistful Thinking

Emma takes a break on Meme and D-Dad's new outdoor playset.


At Oxford Lake, Emma loved going down the slide head first.


Profile of a cutie.


Sisters make great playmates!

Photos by Bob Prichard


Posted by Picasa

Sunday, April 20, 2008

Journey to Cedartown

This weekend holds many special memories. I travelled to Cedartown, Ga., to speak for the annual ladies day at the Cedartown Church of Christ. This was my first visit to this gracious Southern town, and what a blessing it was! I arrived Friday night and drove to the church building, were I met several ladies from the congregation who were hard at work making final preparations for the big event. Immediately I was welcomed into the warm embrace of this gracious group of Christian women. After corresponding with ladies day organizer Dot McCoy for nearly a year, meeting her face-to-face was like reconnecting with an old friend. I enjoyed dinner out with several ladies from church and thoroughly enjoyed visiting with everyone. It is such a blessing to visit a new place and discover that I have family waiting for me there! Our ladies day on the theme "Giving for All It's Worth" was such a blessing to me, and I am still feeling the glow from our special time together. Here are a few images from my journey to Cedartown.

The view from Highway 27 heading toward Cedartown was breathtaking.


This cheery spring wreath said welcome. The joyful sounds of laughter and conversation met me when I opened this door Friday afternoon.


The ladies provided a delicious lunch of southern favorites: barbecue, baked beans, coleslaw, celery, potato chips, pound cake and lemon pie.


Time for a book signing! The Cedartown Church generously gave copies of my book to the more than 100 ladies who attended the event.


Posted by Picasa

Friday, April 18, 2008

Art Under the Stars

Last night we attended my favorite annual event at the elementary school: Art Under the Stars. In the weeks leading up to the event, each grade studies a different artist and creates artwork in that artist's style. For Art Under the Stars, all the halls are completely made over and each student's artwork is displayed gallery-style on the walls. Families stroll the halls to view the art while lights twinkle overhead and live music plays in the background. When parents make a donation to their child's classroom, "sold" signs are placed on their child's art. This year we also purchased a professionally-framed piece of art to support the PTO. This is the first year the school has used this framing company, and one teacher told me the company rep was so impressed with the event that he is flying colleagues down from New Jersey to see it! Here are a few images of our Starry Night at Art Under the Stars.

"The true work of art is but a shadow of the divine perfection." -- Michelangelo

Carson shows us his framed artwork in the style of Van Gogh.


Carson's recreation of Starry Night.


A boy and his self-portrait.


Carson's Van Gogh-style sunflower.


Posted by Picasa

Art Under the Stars

Kindergarteners created artwork in the style of Picasso.


Christian and Emma pause in front of classmates' framed artwork. Christian's piece is on the bottom.


A close-up view of Christian's framed piece.


Christian's wall display of Picasso-style art. His teacher took pictures of all the children painting.


Posted by Picasa

Thursday, April 17, 2008

The Kingdom Celebrates

Today is Carson's birthday! I can't believe he is 9 years old; where has the time gone? It seems like just yesterday the doctor placed him in my arms, and now he is nearly as tall as me. It is such a joy to watch him grow and become. He is such a smart, funny, energetic, athletic and creative boy. He is such a blessing to our family, and I can't wait to see what this next year brings.

We celebrated Carson's birthday earlier this week with a trip to Pump It Up. Carson really wanted a destination party this year, and this turned out to be a tremendous blessing with Joe's recent hospital stay and surgery. Several friends from church and school joined us, and everyone had a great time running, bouncing and sliding. Joe and I treasured seeing all four of our children, ages 2 to 8, jumping for joy. It was a great night of family fun.

Happy birthday, my sweet Carson! I love you so much, and I am so proud of you!

Carson was king with a castle cake formed from two square layers of chocolate cake. I cut each layer in half and stacked three halves to make the back of the castle. I cut the final half-layer into pieces to fashion the front of the castle and used ice cream cones to make the turrets. Buttercream icing held everything together. Brave knights, a fierce dragon and a "Happy Birthday Carson" flag added the finishing touches.


The knights of the birthday table, pausing for a photo after an hour-and-a-half of jumping.


The birthday king, happy to get some gold bars from his grandparents, perfect for a royal caravan into the village to visit Toys 'Art' Us!


Posted by Picasa
Blog Widget by LinkWithin