Wednesday, December 31, 2008

Christmas Memories

Christmas 2008

Clockwise, from left corner: Christian pauses from making an ornament at the junior youth Christmas party. Emma sings carols with her preschool class. Mary Ashley opens her present during her preschool gift exchange, excited to discover something on her wish list: a diary with a key. Carson and Christian open gifts on Christmas morning. Posing with cousins on Christmas Day (eager to open gifts). Posing with cousins on Christmas Eve (eager to open gifts). Caitlin discovers a cutie in the mirror Aunt Jennifer gave Mary Ashley. Our family's newest gift from heaven: Kadence.

Center: A kids-eye view of the treasures to be discovered on Christmas morning.


(Photos of Kadence, Caitlin and Prichard cousins by Nathan Prichard)


Tuesday, December 30, 2008

One More Round of Cupcakes

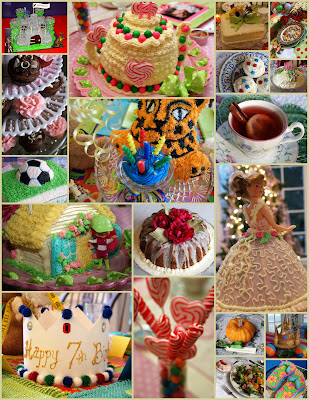
I'm squeezing in a few more cupcakes before the year ends, this time entered into a Martha Stewart online contest. Click here to view my niece Caitlin's recent cupcake party. I entered her birthday outfit, favors and decor in the machine embroidery category. The contest ends tomorrow, so please have a look at my entry. I'll let you know if anything comes of this, and in the meantime I'll be thinking of more sweet treats to share in the New Year!


Monday, December 29, 2008

Sweet Memories

"Nothing is more memorable than a smell. One scent can be unexpected, momentary and fleeting, yet conjure up a childhood summer beside a lake in the mountains; another, a moonlit beach; a third, a family dinner of pot roast and sweet potatoes during a myrtle-mad August in a Midwestern town. Smells detonate softly in our memory like poignant land mines hidden under the weedy mass of years. Hit a tripwire of smell and memories explode all at once. A complex vision leaps out of the undergrowth." -- Diane Ackerman, "A Natural History of the Senses"

Here's to a year of simple celebrations, sweet memories and the smell of freshly-baked cupcakes wafting through the house. To treasuring little moments, rejoicing in victories, and saying I'm sorry. To living fully, loving deeply and laughing often. To thanking God for family, friends and those we hold dear. And to making the every day special.

And to doing it all again next year.


(Check out Cindy at My Romantic Home for more 2008 Year in Review Photos!)

Saturday, December 27, 2008

And on the Final Birthday of the Year ...

Mommy rested.

And asked to be taken to tea.


Collage Images from Google


Thursday, December 25, 2008

Merry Christmas!

"The best of all gifts around any Christmas tree: ...


... the presence of a happy family ...


... all wrapped up in each other."


"Every good thing bestowed and every perfect gift is from above, coming down from the Father of lights, with whom there is no variation, or shifting shadow" (James 1:17).

Merry Christmas from the Lester Family!


Wednesday, December 24, 2008

A Cup of Christmas Tea

Won't you join me for a cup of Christmas tea?


Tea Time Menu:

Cranberry-Apricot Scones served with Strawberry Preserves and Almond Cream

Ham and Turkey Spirals, PB&J Presents, and Roast Beef and Swiss on Yeast Rolls

Fresh Pineapple

Heart-Shaped Brownies

Sweet Torta with Butter Cookies

English Breakfast Tea


Sweet Torta

I discovered this princess of an appetizer when I travelled to Columbus, Ohio, for a ladies day. It has since become a staple on our holiday menu. I doubled the recipe below to make the small torta pictured, plus two larger ones for family gatherings this Christmas.

1 pound cream cheese, softened
1 pound unsalted butter, softened
1 cup sugar
1 teaspoon vanilla
1 teaspoon almond extract
Fresh fruit (I used kiwi and raspberries with raspberry jam)
Cheesecloth (available in the craft section at Wal-Mart)
Sweet dessert crackers

Blend cream cheese, butter, sugar, vanilla and almond extract. Select a mold. (I used a scalloped cake pan in the photo and used a jello mold and a shaped bowl for the other two tortas I made this holiday. You could use a canister, flower pot, etc.) Cut a piece of cheesecloth larger than the container. Moisten two layers of the cheesecloth with a little water, then push them into the container to form a layer. Leave excess cloth draped over the edge of the container. Place a layer of cream cheese mixture into the pot, pushing it down into the container. The layer should measure about 1/2 inch. Add a layer of fruit, spreading fruit to the edge of the container. Alternate layers of cheese mixture and fruit, gently pushing down on the mixture as you layer to eliminate gaps. Finish with a layer of cream cheese. Cover with plastic wrap and refrigerate for several hours or overnight. This may be made two days ahead. To unmold, invert on plate and pull pot off mold, then peel off cheesecloth. Garnish with additional fruit, and serve with sweet crackers.


Our little friends Emma and Lizzy joined our tea table today, but their mom was keeping vigil at the hospital with a sick relative. We missed her and hope this basket of treats brought comfort on a most difficult day.

Thank you for stopping in for a cup of tea today! I hope your cup runs over with blessings this Christmas!


Tuesday, December 23, 2008

My Pink Christmas Tree

The highlight of the Christmas season at our house is decorating our Christmas trees. Joe and I decided years ago that we would indulge our differing tastes with two trees. His is our family tree, with colored lights, icicles and a variety of ornaments. We gather here to see what surprises Christmas morning has brought. My tree sits in the bay window of our sitting room. Guests are surprised to find real porcelain dolls and china teacups tucked into its branches. With white lights, silk flowers and pastel ornaments, this tree provides the perfect backdrop for spending a quiet moment during the holidays.


Many of my grandmother's hand painted ornaments decorate the branches of my sitting room tree. With one-stroke painting techniques, she creates one-of-a-kind ornaments that are great for hanging on the tree or giving as gifts. Tied with a ribbon on the top, a hand painted ornament would be a sweet party favor.


My grandmother found the ornaments that fill this vase at a thrift store this year. She purchased several boxes of discarded ornaments for pennies; and with a stroke of her brush, she turned trash into treasure.

I enjoy displaying pretty ornaments on my sitting room tree, but the sitting room is also a great place to display some kissing angels.


Like Emma and Mary Ashley!

Today our friends Lizzy and Emma are joining us in the sitting room, so I hope you'll plan to stop by tomorrow for a cup of Christmas tea.


Monday, December 22, 2008

Birthday Doll Cake

I believe every little girl should have a doll cake once during her childhood, so I was thrilled to make this cake for our friend Emma's 5th birthday. I baked this strawberry cake in a Wilton doll cake pan and iced it smooth with pink buttercream icing. I slipped the doll pick into the cake and covered the bodice with pink icing stars and tiny white ruffles. I covered the skirt with delicate cornelli lace and finished off the hem with two layers of ruffles and beads of icing. Sprays of rose buds and icing ribbons completed this little girl's dream come true. (You can click on the photo to enlarge the collage. I wanted to photograph details on the back of the cake, but I get so tickled every time I look at the doll posing for her over-the-shoulder shot!)


The girls loved joining their friend Emma for her birthday party at Club Libby Lu, and riding the train together afterward was the perfect end to the celebration.

Friday, December 19, 2008

Holiday Brunch Recipes

A hearty breakfast casserole accompanied by fresh fruit, grits and muffins creates a lovely harmony on a holiday brunch menu. And a cup of tea and slice of honey bun cake end the meal on a perfect note.

Breakfast Sausage Casserole

I served this Cooking Light recipe a couple of years ago to rave reviews at a Twas the Night Before Christmas party. I recommend this dish any time of day!

1 (16-ounce) package frozen turkey sausage, thawed (I couldn't find turkey, so substituted pork)
8 (1 1/2-ounce) slices sourdough bread, cut into 1/2-inch cubes (about 8 cups)
2/3 cup (about 2 1/2 ounces) shredded sharp cheddar cheese
3 cups 1% low-fat milk, divided (I used about 2 cups of skim milk)
1 cup egg substitute
1 tablespoon Dijon mustard
1 (10.75-ounce) can condensed 30% reduced-sodium, 98% fat-free cream of mushroom soup, undiluted

Heat a large nonstick skillet over medium-high heat. Coat pan with cooking spray. Add sausage to pan, cook 5 minutes or until browned, stirring well to crumble. Arrange bread in a 13 x 9-inch baking dish coated with cooking spray. Top evenly with cooked turkey sausage and cheddar cheese. Combine 2 1/2 cups milk, egg substitute and Dijon mustard, stirring with a whisk. Pour over bread mixture in dish. Cover and refrigerate 8 hours or overnight. Preheat oven to 350 degrees. Whisk remaining 1/2 cup milk and soup. Pour over bread mixture and bake for 1 hour or until lightly browned. Let stand 15 minutes before serving. Yield: 8 servings

Honey Bun Cake

My sister, Jennifer, shared this recipe with me. This cake makes the whole house smell wonderful. Freshly baked and glazed, each bite will nearly melt in your mouth.

1 box yellow cake mix
4 eggs
1 (8-ounce) container sour cream
2/3 cup oil
1 cup brown sugar
2-4 tablespoons cinnamon

Glaze:
3/4 cup evaporated milk
1 box confectioners sugar
2 teaspoons vanilla extract

Preheat oven to 350 degrees. Mix first 4 ingredients together and pour half of batter into sheet pan. Mix sugar and cinnamon and sprinkle over batter in pan. Spread remaining half of batter in pan over cinnamon and sugar mixture. Bake for 35-45 minutes. When cake is done, punch small holes all over the top of the cake with a fork and pour on the glaze. Notes: Release cake from sides of pan before glazing. I like preparing this cake in a Bundt pan. I pour the glaze onto the cake and let it pool in the middle of the cake and seep around the serving dish. Silk flowers tucked into the center add a festive touch.


Thursday, December 18, 2008

In a Pear Tree?

Last year as our family sat around the breakfast table Christmas morning, then 8-year-old Carson brought up the familiar holiday song "The Twelve Days of Christmas."

"Wouldn't it be funny," he asked, "if someone ended the song 'and a Pop Tart in a pear tree'?"

That question led to a fun family game that stands out as my favorite memory of last year's holiday, as we turned the familiar carol into "The Twelve Breakfasts of Christmas." We worked our way around our table of six as we sang, adding to the list one by one. Even little Emma, still 1 at the time, would chime in with the words she could remember.

As we progressed through the song, we laughed trying to remember each family member's choices: "... four bowls of cereal, three French toasts, two scrambled eggs and a Pop Tart in a pear tree." Even months later, the children giggled trying to recall all 12 breakfasts.

Although by now most of our silly lyrics may have been forgotten, the blessings of that precious family time remain. I will always remember the simple beauty of that moment: the comfort of gathering around the table as a family on Christmas morning; the love in the room so intense it was palpable; and the sweet harmony of voices raised in laughter and song.

In short, it was pure, unbridled joy.

I hope our family will share many more serendipitous moments like this over the years because it's these special memories that draw our hearts home at the holidays.

And years from now, I hope you will know us if you see our family gathered for Christmas. We'll be the ones who erupt into giggles as our voices ring out at full voice: "Five strips of BACON!!!"

Photo from Google Images


Wednesday, December 17, 2008

Christmas Ballerinas

One of the highlights of the holiday season for me is attending Mary Ashley's Christmas recital. She was all smiles on the stage, and when she shyly said her name into the microphone, a chorus of "ahhs" rippled through the audience. After the show we went out for dessert, and back at home she unwrapped a ballerina Barbie to commemorate the event.


This was my other favorite ballerina of the night. Isn't Judy's granddaughter, Taylor, a beautiful girl? I was already poised to take pictures of Taylor during her performance, but when she was asked to announce her name and said "Mary Ashley," I thought I might get to take her home with me! Isn't that adorable?


You never know quite what will happen when the tiniest ballerinas take the stage, but you know it will definitely be entertaining! I love watching these little ones.

And most people at the recital probably missed the newest ballerina ...


Little sister, Emma! Emma was so entranced by the ballerinas this year, she couldn't wait to take the stage for pictures after the recital. Immediately she started twirling and imitating the steps she had watched during the show. So guess who gets to start taking ballet after the holidays? Emma, the happiest ballerina-to-be in Alabama!

This should absolutely guarantee an entertaining spring recital!


Tuesday, December 16, 2008

Cocoa Crafts

For a fun classroom treat, fill holiday mugs with this easy dessert.

When Carson's teacher invited parents to visit her fourth-grade class during the holiday season to read a story and do an activity, I planned an enjoyable hot-chocolate themed afternoon that was a hit with all the children. I found cute mugs at Wal-Mart for the students and filled each one with a yummy chocolate parfait. After our story time, the children ate their desserts and made cocoa cones.

Hot Chocolate Parfaits

This recipe provided enough desserts for Carson's class of 26.

1 brownie mix prepared according to package directions, with a couple of handfuls of chocolate chips sprinkled across the batter, baked in a 9" x 13" dish
2 tablespoons coffee, optional
3 (2.1 ounce) packages sugar-free instant chocolate pudding mix, prepared according to package directions
1 (16 ounce) container frozen fat-free whipped topping, thawed
1 (10.5 ounce) bag marshmallows
26 small mugs

Poke holes in warm brownies with a fork, and drizzle coffee over. (I wasn't sure fourth-graders would appreciate the added coffee flavor, so I omitted this step, but an older group would probably enjoy the added dimension of flavor.) Slice pan to make 40 brownies (8 rows by 5 rows), and place a brownie in the bottom of each mug. In a large bowl, fold whipped topping into pudding. (I layered the whipped topping and pudding in the mugs since I didn't know how much of each I would use, but I think the lighter colored pudding mixture would look more like a mug of hot chocolate.) Spoon the pudding mixture into each mug, and sprinkle a few marshmallows onto each dessert. (Note: Preparing the pudding mixture ahead and baking the brownies shortly before serving results in a pleasant mix of hot and cold, but you can prepare and refrigerate this dessert up to a day ahead.)

Sometimes sold in gift boutiques and gourmet food stores, cocoa cones are easy to make. Carson's fourth-grade class enjoyed assembling these as a gift for someone special. These would also make a sweet party favor at a holiday gathering.

Cocoa Cones

Carson's classmates were excited to make a gift to share with a parent or friend.

1 package of 12 inch disposable decorating bags (found with cake decorating supplies in craft and mart stores)
3 (20 ounce) cans instant hot cocoa mix
2 (10.5 ounce) bags marshmallows
2 (11.5 ounce) bags milk chocolate chips
26 (20 1/2") ribbons

For each cocoa cone, we scooped 1/3 cup cocoa mix into a decorating bag and shook it gently to make sure all the hot chocolate settled into the bottom of the bag. Then we added 1/2 cup marshmallows and 1/8 cup chocolate chips and tied the top tightly with a ribbon. Making these in Carson's class, I worked with the students two at a time. I had each student open a decorating bag and hold it open while I scooped the treats into the bag. Then each student chose a red or green ribbon and tied it around the top. Completing this project with the entire class of 26 took around 30 minutes. Children need to be reminded to carry their cones home upright so the layers will not shift and the cocoa won't spill.

After school, Carson was pleased to report that his classmates said our afternoon took first place among all their holiday activities this year. He was so proud he even chanted, "Mom's Number One!" in the middle of a store.

Public praise from an almost 10-year-old? Now that beats a cup of hot chocolate any day!

Monday, December 15, 2008

Ornament Party

We had a ball yesterday hosting a Christmas party for elementary-age children from our church. Our youth minister planned for the children to make ornaments to place in fruit baskets for our shut-ins, so this set my theme for the day. Plastic tablecloths and rolls of gift wrap gave the children a stress-free place to eat and craft, while ornaments hung from the chandeliers and clustered in vases added sparkle to the tablescape. Fresh greenery and berries finished off the tables.

I had planned to make ornament cupcakes for the occasion, but the past week has been so busy that when I bought groceries for the party, I realized that I was too tired to even shop for the ingredients. So I bought mini-cupcakes. Yes, I did, and what a relief! The children still loved them and my husband said that he had never been more proud of me.

Other parents contributed sandwiches, chips, cookies and drinks to our meal, and I served the spinach-tortellini soup pictured above. Although many of the children were afraid to try the soup, the ones who ventured a taste seemed to like it. And this recipe met rave reviews from the adults who ate it.

Spinach-Tortellini Soup

This tasty soup is a quick fix anytime, but I thought it would be fun to serve for the holidays since it is red and green. And if you're in a festive mood, the tortellini might even look like little wreaths. Yield: 34 cups

32 ounces organic chicken stock
8 cups water
4 chicken bouillon cubes
2 (10-ounce) packages frozen spinach, unthawed
4 (14 1/2-ounce) Italian stewed tomatoes with basil, garlic and oregano
2 garlic cloves, minced
26 ounces three-cheese tortellini (boxed or refrigerated)
1/2 teaspoon salt
1 teaspoon pepper
2 cups shredded Parmesan cheese

Bring first three ingredients to a boil in a large pot over medium-high heat. Add spinach, tomatoes and garlic; return to a boil. Stir in tortellini and cook 5 minutes. Add salt and pepper and serve warm. Sprinkle each serving with cheese. (Note: I made the soup the day before the party, and the flavor was good but the tortellini was soft. I suggest serving the soup as soon as you make it if you prefer pasta al dente. Plan to thin the soup with chicken stock when you reheat it if you need to prepare this dish ahead.)


Our dining room chandelier got special treatment at the party today with 24 ornaments hung from its branches. For this look I cut lengths of ribbon, tied an ornament to each end, and draped the ribbons over the arms. I tied a cluster of ornaments to the center of the fixture, and played with the positioning of all the ornaments. Fresh greenery fashioned loosely into a wreath finished the design. The resulting look was easy, inexpensive and festive.


Happy faces from today's party. I hope you kids had a ball!

P.S. Happy birthday to Hannah! I wish you could have joined our party!


Friday, December 12, 2008

Let It Snow!

As much as I love the hustle and bustle of the holiday season, I find myself yearning for stillness these days. For even just one night, I want everyone to stay home, snuggled up before a crackling fire to sip hot chocolate and read some of our favorite storybooks while the world goes on without us.

This weary mom wants a snow day!

Of course, my southern children long for snow too. So even if our Alabama weather will not cooperate, I have a plan for taking a snow day someday soon. With our full holiday schedule, this party may have to wait until the new year. But sharing a special evening together might be a good way to combat post-holiday boredom in the long winter nights to come. Maybe these ideas will inspire a snow day at your house too!

This party was inspired by snowman sandwiches I saw in a family magazine a couple of years ago. The beauty of this meal is its playful take on a simple supper. A few thoughtful touches elevate the humble soup-and-sandwich combination to a memorable party.

For the above meal, I sprinkled powdered sugar onto a dinner plate to create a light dusting of snow. Cookie-cutter sandwiches form the body and head of a snowman, and carrots, sprinkles and chocolate chips add details. (Pretzels work well for the arms, but I didn't have any when I assembled this plate.) A hat and scarf cut from scrapbook paper add whimsy, while extra-special touches like gluing a pom-pom to the hat, writing a name on the scarf, and cutting fringe on the ends of the scarf add those extra-special touches.

A mug of soup positioned alongside the snowman looks inviting on a cold winter day. I used vegetable soup for the photo above, but for our upcoming snow day nothing would delight my children more than for me to open a can of Campbell's chicken noodle soup.

To make the most of our snow day, the children will be snuggling up in these ... .


Cute snowman pajamas from Lakeside Collection will keep the children warm throughout the winter, and at only $7.95 each I can afford to dress all four alike. And once in our PJs, we'll be ready for this ... .


I found this book, Christmas Magic by Michael Garland, in the clearance section of a local bookstore. This will be a great read during our snow day.

Of course, we'll have all the supplies we need for our snow day: soft blankets for keeping out the chill; hot chocolate piled high with marshmallows for melting our troubles; and the ones we love most drawn close to warm our hearts.

So when the busyness of this hectic season overwhelms you and you feel the need to slow down and rest, don't despair. Just let it snow!


Wednesday, December 10, 2008

Once Upon a Snow Day

Last year we spent a special week with Joe's family in the mountains of Breckenridge, Colo., for Thanksgiving. Snowy Colorado seemed a world away from sunny Alabama, and when we returned home I wanted to preserve our memories for the children. With Christian's sixth birthday fast approaching, I decided to write our experiences in a story book called "Christian's Snow Days."


Creating a book was time intensive but easy on Shutterfly.

I uploaded photos to my account and planned a storyboard chronicling our week from beginning to end. I began the story with 5-year-old Christian's dream of seeing snow. The story progressed as his family flew to Colorado and found their cabin in the woods. I tried to create vivid word pictures of all our adventures, including fun details like the stops we made ducking into shops in downtown Breckenridge. Photos brought the book to life, and a nearly infinite selection of page layouts and backgrounds allowed me to completely customize the book.

Joe and I surprised Christian with the completed book and read it as a family the night before his birthday. Then on his birthday I took it to school to share with his class.

Christian was the star of his kindergarten class when we gathered for story time. I asked the children when they sat down if any of them had ever seen snow. Only a handful had, so they were excited to hear a story about a little boy whose dream of seeing snow had come true. "Do you know anyone named Christian?" I asked as I opened the book. All the children pointed to Christian, and he grinned sheepishly.

The children enjoyed hearing about Christian's magical adventures in Colorado. They giggled as they watched him sled down a snowy mountain, and their eyes grew wide as they heard about all the excitement on the ski slopes. They smiled dreamily as our story finally came to a close:

The next morning, Christian's family said farewell to their cabin before the sun came up. As they drove down the mountain, twinkling lights from the village below seemed to beckon them to come back soon. Christian gazed out the window as they drove toward the airport, awestruck as he watched the full moon dip behind the mountains and the sun rise to illuminate the view. In that moment Christian thanked God for the snow, for Colorado, for this magical week with his family.

Back home, Christian's memories of Breckenridge took on a dreamlike quality. Time moved swiftly, and sunny Alabama seemed a world away from the snowy mountains of Colorado.

But each year at Christmas, the ornament he bought in Breckenridge takes him back to the snowy village he once visited with his family. As Christian places the ornament on the tree, he feels a cold mountain breeze that sends a chill down his spine and fills his heart with warmth.

I hope that one day Christian will read this special story to his own children, retracing his footsteps through the snowy mountains of Colorado through the words and pictures on the pages of "Christian's Snow Days." And as he shares this magical chapter from our family's past, I hope this book will remind him of the love that fills each page in the story of us.

Tuesday, December 9, 2008

Pottery-Painting Party

You won't find December birthdays wrapped in Christmas paper in our family. Continuing my birthday theme, I thought it would be fun to revisit one of my favorite parties. For Christian's 5th birthday, we painted Christmas ornaments at a local pottery studio. I made the invitations on my computer, fitting the text on a piece of clip-art. I printed the pages on card stock and cut out the artist palettes. Since he was turning 5, I let the Birthday Boy choose that many colors of puff paint. I applied squiggles of paint to each invitation. The paint added texture and interest to the invitations, and the shiny puff paint looks wet. For the final touch, I punched holes in each invitation and slipped a paint brush through. And I was ready to create my masterpiece:

The Cake ...


In keeping with our creative theme, I printed a copy of Van Gogh's Starry Night and used the image as a guide to trace the familiar painting into a crumb coat of icing. I filled in the painting with buttercream icing and Skittles. Yellow icing framed the masterpiece, and a paint brush placed on top of the cake added one final touch of whimsy.


Christian and friends enjoyed a colorful evening at the pottery studio. We sent the children home from the party with colorful bags of candy and mini-paint sets, and within a few days we had their ornaments to distribute. Hung on our tree, our children's pottery ornaments remind us of the magical year Christian turned 5.


Monday, December 8, 2008

Happy Birthday, Cupcake!

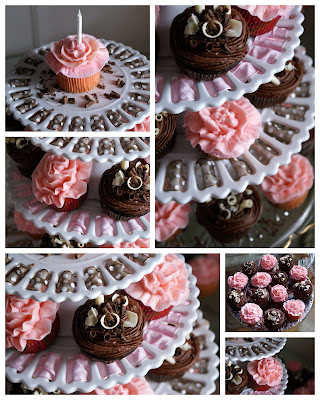
We travelled to Nashville, Tenn., over the weekend for my sweet niece Caitlin's first birthday. My sister, Jennifer, planned a cupcake themed birthday party with a pink and brown color scheme. Every detail was adorable, just like the Birthday Girl!


Jennifer asked me to make Caitlin's birthday outfit, and I surprised her by making the dress reversible. Coordinating bloomers will look cute with both sides of the dress. Covered buttons and rickrack at the hem add sweet details.

Aunt Melissa's Bakery was happy to deliver cupcakes for the party. In keeping with the pink-and-brown color scheme, we tempted guests with sweet strawberry cupcakes covered in ruffles of pink buttercream icing and decadent chocolate cupcakes topped with chocolate buttercream icing and chocolate curls. To make the chocolate curls, I microwaved one square each of bakers chocolate and white chocolate for 25 seconds. I allowed the chocolate to cool for a few minutes, then shaved the squares with a vegetable peeler. I let the resulting curls fall back onto the plate and put the plate in the freezer until they hardened to the touch. Then I tucked curls onto the cupcakes and sprinkled extra curls onto the serving dishes.


And these cupcakes are meant to last. Jennifer prepared sweet pink and brown gift bags for all the children at the party, and I embroidered coordinating turtlenecks for the girls. Jennifer included toys for the boys, and she finished off each bag with a pink and brown polka dotted bag of pink M&Ms. The children were so excited over their goodies, but the sweetest treat of all for everyone was spending time with Caitlin. Happy Birthday, Cupcake!


Friday, December 5, 2008

A Beary Special Birthday

Happy 7th Birthday, Christian!

The Invitations ...

For this year's birthday party, we planned a small celebration with cousins and two friends at Build-a-Bear Workshop. Since our guest list was so small, I attached the invitations to stuffed bears purchased at Wal-Mart. Colorful signs proclaimed, "We're Making Memories for Christian's Birthday and Can't Bear to Celebrate Without You!" Quilter's measuring tape wrapped around the bears alluded to the workshop theme, and a handwritten note explained party details.

The Cake ...

Christian wanted to make a tiger at Build-a-Bear, so I went into my own creative workshop to surprise him with a tiger cake. I used the Wilton stand-up bear cake pan for this project. I asked our resident expert on big cats, Carson, to draw stripes in the icing with a toothpick. Then I filled those in with black icing and a star tip. Orange icing piped on with tip 233 covered the rest of the cake in fur. A single cupcake held the candles and added a festive touch. The birthday boy ate this cupcake during the party.

The Crown ...

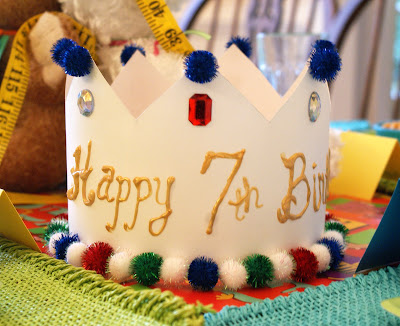
Making a birthday crown is one of our special traditions, and I will crown Christian the Birthday King for as many years as he enjoys it. Each year near his birthday, Christian is fitted for his birthday crown with a measuring tape. This year the circumference was 20 1/2 inches, so I used a wide ruler to lightly trace a rectangle 5 inches tall and 21 inches long. To create the points in the crown, I placed dots at 3-inch intervals across the rectangle. Then I centered dots 1 1/2 inches below the first dots. I used the ruler to draw straight edges connecting the dots in a zigzag pattern. I cut out the crown, overlapped the ends, secured the seam with invisible tape, and trimmed the extra points at the seam. (Christian was so excited that his crown had seven points!) Then I hot glued pompoms around the crown, starting at the center and working my pattern outward. Pompoms and plastic jewels glued to the points added pizazz, and a puff paint birthday message completed the royal tradition.

The Table ...

After a trip to Build-a-Bear Workshop, we turned home for cake and presents. Christian requested a jungle theme, so I went wild with this year's decor. Place mats, glass tumblers, lime green and turquoise ramekins, and a roll of zoo-themed wrapping paper from Dollar Tree were economical choices for decorating the party table. Paper plates from Target and napkins from Wal-Mart fit our color scheme perfectly, and Martha Stewart animal stickers added a cute touch to place cards made from card stock. Our tiger cake made a festive centerpiece, joined by the bear invitations. Blue, green and white balloons cascaded over the table; and moved to a side table, my Thanksgiving centerpiece added warmth to the room. Snacks were kept simple with Goldfish, cake and ice cream. Orange soda was a special party treat, and the children enjoyed bringing their Build-a-Bear buddies to the table. It was a beary special day celebrating a super-sweet boy!

We Love You, Christian!


Build-a-Buddy

We had a wonderful time visiting Build-a-Bear Workshop with cousins Hollis and Reese and friends Gavin and Garrison for Christian's birthday. This was my children's first trip to Build-a-Bear, and we loved it! Although my sister-in-law and I really wanted to make bears for ourselves, we lived vicariously through our children's fun. After Build-a-Bear, we took our new buddies home for cake and presents. Our day of celebration was absolutely pawfect!


Thursday, December 4, 2008

Breath of Christmas

A friend shared this refreshing treat with my parents years ago, and it has become a family favorite. To make peppermint sundaes, drizzle egg nog over peppermint ice cream and garnish with peppermint pieces or chocolate curls. Yum!


Wednesday, December 3, 2008

Spreading Joy

Put a little joy in your hearth by shaping wreaths and swags into letters to hang above the fireplace. For trickier shapes, cut down swags with bolt cutters and attach extra pieces of greenery with wire. Wouldn't this be a cute way to display your monogram during the holidays?


Tuesday, December 2, 2008

Greet the Season

Our 2008 Christmas Card Photo

One of the delights of the holiday season is receiving Christmas cards. The walk to the mailbox is more exciting this time of year, as we look forward to hearing from loved ones. This simple holiday exchange allows us to reconnect with all those we hold dear, and it is amazing to watch friends' children grow through their Christmas card photos from year to year.

As much fun as it is to receive holiday cards, sending them can become a chore. But with a few simple tricks, you can have your cards filled with love and sealed with a kiss in no time.

  • Say Cheese! If you are taking the pictures yourself, my photographer friend Allison suggests taking pictures in natural light. She advises choosing a shady spot out of the harsh glare of the sun for the best results.
  • Strike a Pose. Unsure that I would get a group shot that flattered all the children this year, I started our photo session snapping individual photos of each one. Catching them at play seems to yield the best shots. And loosely grouping them together and shooting their natural interaction catches some sweet moments. (At least, until those warm embraces turn into a wrestling match between the boys!) An ornament and a wrapped gift made easy props for our photo session.
  • Go to Collage. Making a collage is a great way to incorporate several favorite photos. I enjoying using Picasa, which can be downloaded free from Google here. This user-friendly program allows you to edit photos with the click of a mouse. And you can make collages easily in a variety of shapes and styles. I had a little trouble working out this year's collage, so I photographed the wrapped gift and placed it in the center.
  • Open a Print Shop. I started printing our Christmas cards from our computer a few years ago, and this has proven an economical choice. Simply measure your cards and create a document that size in your word processing program. Adjust the margins to allow for perfect placement of your holiday greeting. You can find lots of quotes, verses and greetings online. And consider adding text boxes with fine print to the inside edge and back page of the card. I like including a line with the children's names and ages inside the card, and our contact information on the back. Adhere photos to the front of the card with double-stick tape or photo-safe glue. Making your own Christmas cards, you can completely customize your design with stickers, ribbon or other embellishments. Or if you are sending a lot of cards, keep it simple and sweet.
  • Keep Up with the Joneses, Smiths and Grahams. I am organizationally challenged, so to keep up with holiday correspondence, I place a pretty basket near the door with extra Christmas cards, stamps, a pen and my address book. Keeping these supplies close at hand helps me record address changes as cards come in, and allows me to respond quickly to Christmas cards we receive from families who need to be added to our list.
  • Show Your Cards. Consider replacing plates on a plate rack with framed Christmas card photos. Scrapbook paper makes a pretty mat, and a festive bow adds a seasonal touch to the frame. Cluster incoming cards in a pretty basket, or clip them into garland around your kitchen window. Joe's mother still has laminated place mats displaying holiday greetings his late grandparents received long ago. Another family has kept all the cards they have received over the years. They keep them in a special box and enjoy sifting through old photos in front of the Christmas tree.

No matter how you say it this year, Merry Christmas to you!


Monday, December 1, 2008

Holiday Cake Stand

Merry Christmas!

I'm heading to the Dalraida Church of Christ tonight for their annual ladies Christmas party. At this year's potluck and ornament exchange, I'll be serving up holiday hints for adding a little loveliness to the season with some of my favorite ideas for Christmas gifts, decor and entertaining. And with the theme "10 Under 10," all the ideas will cost less than $10, take less than 10 minutes, or work great for children under age 10.

Of course, easy and economical cake plates make the Top 10! Simply glue a plate and bowl together with E-6000, let the glue dry according to package directions, and you have a festive cake plate ready to put dessert on a pedestal at your next holiday gathering. Or make several cake plates to share with neighbors, co-workers and friends!


I hope you'll come back often this month as we dish up lots of ideas to celebrate the season!


Blog Widget by LinkWithin